Humidity. Our air carries a large moisture load already, which means dryer exhaust has less capacity to shed the moisture it is carrying. Drying takes longer, the dryer runs more, and more lint moves through the duct per load.
Long duct runs. Many homes here, particularly two-story construction and homes where the laundry is centrally located rather than on an exterior wall, have vent runs that travel a long distance with multiple turns. Every foot and every elbow adds resistance, and resistance is where lint drops out and accumulates.
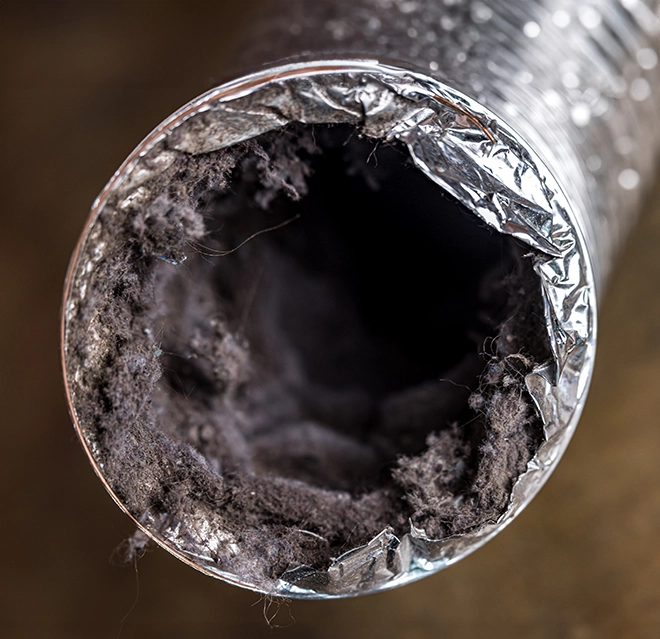
Flexible foil and plastic transition duct. Ribbed flexible duct traps lint in every corrugation, and it is far worse than smooth rigid metal. Plastic and vinyl transition duct is a code problem in addition to a performance one. If your dryer connects to the wall with white plastic flex, that should be replaced.
Crushed transition duct. The most common defect we find, and it happens the moment someone pushes the dryer back against the wall. A crushed connector at the appliance restricts the whole system regardless of how clean the duct beyond it is.
Bird and pest nesting. Exterior hoods with failed or missing flaps become nesting sites. In this climate, that happens quickly.
Coastal properties. Salt corrodes the exterior hood and its flap hardware, and a flap that no longer closes is an entry point.
What We Actually Do
Inspect the full run first. From the appliance connection to the exterior termination, including the transition duct behind the dryer, which is where the most common defect lives.
Disconnect and clean the transition. The flexible connector between the dryer and the wall is cleaned or replaced. If it is plastic, vinyl, or crushed, we recommend replacing it with rigid or semi-rigid metal.
Rotary brush and vacuum through the full duct length. A rotating brush on a flexible rod works the length of the duct while a vacuum captures what is dislodged. Blowing air into the vent without capture pushes lint into the wall cavity or out into the room.
Clear the exterior termination. Hood, flap, and screen. Lint packs at the termination because that is where velocity drops.
Verify airflow after. Measure or observe at the exterior hood so you know the restriction is gone rather than assuming.
Report defects. Crushed sections, disconnected joints inside a wall or ceiling, plastic duct, missing hood flaps, improper termination into an attic or crawl space rather than outdoors, and excessive run length or elbow count. Some of those are cleaning problems. Some are repairs, and we tell you which.
Defects That Cleaning Will Not Fix
Termination into an attic, crawl space, or garage. A dryer vent must terminate outdoors. Venting into an enclosed space dumps heat, moisture, and lint where it accumulates, and in a humid climate the moisture alone is a serious problem. This is not uncommon in older homes and in some renovation work.
Plastic or vinyl duct. Should be replaced with rigid or semi-rigid metal.
Excessive length or too many elbows. Manufacturers specify a maximum equivalent length for a reason, and each elbow subtracts from the allowance. A run that exceeds it will never perform well no matter how often it is cleaned, and the fix is rerouting or a booster.
Screened terminations. A screen or mesh at the exterior hood catches lint and blocks. Dryer vents should terminate with a proper hood and flap, not a screen.
Disconnected duct inside a wall or ceiling. A separated joint inside the building dumps lint and moisture into the cavity. This is a repair, and it is worth finding.
How Often
Annually for most households. More frequently for larger households, homes that dry a lot of towels and bedding, homes with pets, and homes with long or complicated vent runs.
Immediately, regardless of schedule, if clothes are taking multiple cycles, the dryer or room is running hot, you smell burning, or there is no airflow at the exterior hood.
Clean the lint screen every load. That is the homeowner's job, and it does not substitute for the duct. The screen catches a portion of the lint. The rest goes into the duct, which is the part you cannot see.
Also worth doing: vacuum behind and under the dryer periodically, and check that the transition duct is not crushed after moving the appliance.
Related Services
Written by the team at Aire Serv of Northwest Florida.
Technically reviewed by Justin B., NATE-certified and EPA 608 certified, 19 years in the trade.
Reviewed for accuracy by owner Justin Sonntag, a 26-year Gulf Coast resident.
Florida Certified Air Conditioning Contractor, license CAC1823566.
Last reviewed: September 2026
Questions about your system? Call or book online in about a minute.