Aire Serv explains how to safely recharge your car’s AC system for optimal cooling.
- Locate and inspect the AC system’s low-pressure port.
- Attach the refrigerant canister and gauge.
- Start the engine and set AC to maximum.
- Add refrigerant while monitoring pressure.
- Check cooling performance and disconnect equipment.
Do you know how to recharge your car AC system? Did you even know that you needed to? Just like anything else on your vehicle, the air conditioning system can break down over time due to good old wear and tear. If your car isn’t cooling off as it should, it can wreck your summer road trips. Unless you’re heading out to one of these cooler destinations, you might want to get that cool air flowing again. Instead of investing in a new AC or paying for extensive repairs, first try recharging the system. A batch of fresh refrigerant can make all the difference. If you’re a dedicated DIYer, you might even be able to change it yourself following these steps.
Charge Car AC Systems with These Step-By-Step Instructions
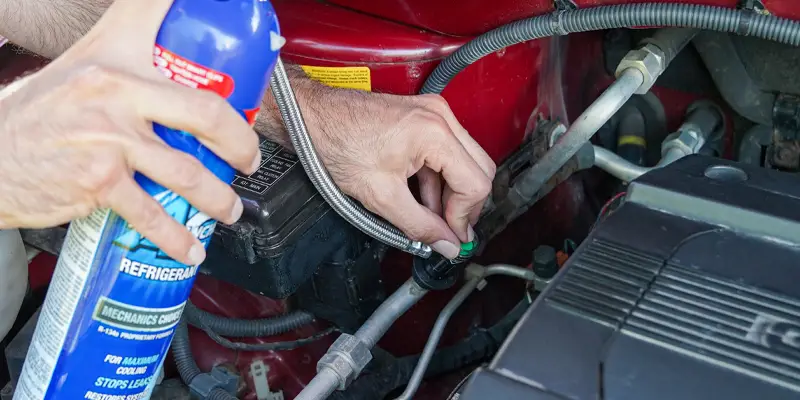
- Locate the AC system low side port
- The low side port, or the low-pressure service port, is important because it’s the point where you connect to recharge the AC refrigerant. Its location varies by vehicle, but you can find it by starting at the compressor. There should be two tubes coming out of the compressor. The larger tube is your low side port, or your low-pressure line. That’s the one you need.
- Attach the refrigerant to the port
- Your recharge kit should come with a can and dispenser, as well as a gauge to determine the pressure. Before you attach the can and dispenser, be sure to determine the minimum and maximum pressure. You can then attach the refrigerant can.
- Turn the AC on and up
- Before releasing the refrigerant into the port, turn on the vehicle and turn the AC on to its max temperature. This will engage the compressor.
- Shake the can
- With it attached to the port, shake the can after three or four seconds. As you release the refrigerant, be sure to check the pressure so you don’t overfill the system. When it reaches the desired pressure, your AC should be recharged and good to go.
Recharging Your Car’s AC May Only Be a Bandage
If your car’s AC is not doing its job, that could be a sign of a refrigerant leak, but it could be a sign of something more serious. A recharge is like a Band-Aid – it will help keep you cool for now, but eventually, you’ll need to have your AC evaluated by a professional to be sure you don’t have to repeat this process and to ensure your AC will keep on ticking through this summer and the summers to come.
Overwhelmed by the Prospect of Recharging Your Car’s AC System?
Does all this sound a little overwhelming? Air conditioning repairs in homes and in vehicles are tricky and can be dangerous if not completed with care. If you’re mechanically inclined or determined to DIY it, following the steps above should help you get your AC back in shape. If you’re not excited by the prospect of learning to charge a car ac system, there’s no shame in taking it to an expert to recharge your AC. They can assess the root cause of the issue while you’re there.
Need help cooling your home or business? Contact your local Aire Serv for help with all your commercial and residential cooling needs this summer.
This article is intended for general informational purposes only and may not be applicable to every situation. You are responsible for determining the proper course of action for your home and property. Aire Serv is not responsible for any damages that occur as a result of this blog content or your actions. For the most accurate guidance, contact the Aire Serv location nearest you for a comprehensive, on-site assessment.
FAQs About How to Charge the Air Conditioner in Your Car
As an industry leader and a brand that is trusted by homeowners and businesses nationwide for our knowledge and experience, we’re happy to answer your HVAC questions. Here are answers to some of the frequently asked questions about how to recharge a car AC.
How do I put Freon in my car?
Follow the steps below to add refrigerant to your car's AC system. This can be a straightforward process, but it needs to be done correctly and safely.
Before beginning, note that “Freon” is a brand name for a specific type of older, ozone-depleting refrigerant (R-12) that is no longer used in new vehicles. If your car was made before 1995 and hasn't been converted, it might use R-12, but recharging this system is best left to professionals.
-
Identify the correct refrigerant type. Check your car's manual or under the hood. There should be a sticker indicating the type of refrigerant your vehicle uses. Common types include R-134a (for most vehicles manufactured between 1995 and 2021) and R-1234yf (for many newer vehicles). Using the wrong kind of refrigerant can damage your AC system.
-
Gather your supplies. You'll typically need a recharge kit, which includes:
- A can of the correct type of refrigerant
- A charging hose with a pressure gauge
- Leak sealant or oil
- Wear safety glasses and gloves throughout the process.
-
Locate the low-pressure service port. Follow the larger of the two aluminum pipes leading from the AC compressor (a belt-driven component on the engine) to the evaporator. The low-pressure port usually has a cap with an "L" on it. If you're unsure, consult your car's service manual.
-
Prepare the recharge kit. Shake the can of refrigerant well. Attach the charging hose to the can according to the kit's instructions. Make sure the piercing valve (if present) is in the "off" or "closed" position before attaching it to the can.
-
Connect to the low-pressure port. Remove the cap from the low-pressure service port. Connect the quick-connect fitting on the end of the charging hose to the port. You'll usually need to pull back a collar on the fitting to attach it. It should snap into place.
-
Read the initial pressure. With the engine and AC off, check the pressure reading on the gauge. This will give you an idea of the current refrigerant level. Refer to the pressure chart on the recharge kit for the recommended range based on the ambient temperature.
-
Start the engine and turn on the AC. Start your car's engine. Turn the AC system on to the maximum cooling setting with the fan on high. Make sure the recirculation mode is also on. Observe the compressor clutch engaging (the center part of the compressor pulley will start spinning).
-
Add refrigerant.
- Hold the refrigerant can upright (unless the instructions specify otherwise).
- Slowly dispense refrigerant by squeezing the trigger or turning the valve on the charging hose. Shake the can intermittently while charging.
- Monitor the pressure gauge frequently. Add refrigerant in short bursts, allowing the pressure to stabilize before adding more.
Do not overcharge the system, as this can damage the compressor. Refer to the pressure chart on the kit for the correct pressure range for the current ambient temperature. The compressor clutch should cycle on and off as you add refrigerant.
-
Monitor vent temperature. As you add refrigerant and the pressure reaches the recommended level, the air blowing from your vents should start to feel colder.
-
Disconnect and recap. Once the gauge shows the correct pressure and the air is cold, release the trigger or close the valve on the charging hose. Carefully disconnect the charging hose from the low-pressure service port. Replace the cap on the service port.
Do you add refrigerant to the high or low side?
You should always add refrigerant to the low side of your car's AC system. Here’s why:
- Safety: The high side of the AC system has extremely high pressure. Adding refrigerant there, especially from a can not designed for high-pressure use, can be very dangerous and could cause the can to explode, leading to serious injury.
- System operation: The low side is the suction side of the compressor, where the refrigerant is in a low-pressure vapor state. The compressor is designed to draw in this vapor. Adding refrigerant to the low side allows it to be pulled into the system safely and mixed properly.
- Proper charging: Recharge kits are specifically designed to connect to the low-pressure service port. The fittings are different sizes to prevent accidental connection to the high side.
Where does Freon go in a car?
Freon, or more accurately, refrigerant, should be added to the low side of your car’s AC system. Once there, it circulates in a closed-loop system within your car’s air conditioning.
Why does my car AC need refrigerant?
Refrigerant (commonly referred to as Freon, although this is an outdated brand name) is the working fluid that carries heat out of your car's cabin and releases it outside. It constantly circulates through these components, changing its state from liquid to gas and back again to facilitate the heat transfer.
Here's a simplified breakdown of where the refrigerant travels:
- Compressor: The cycle begins here. The compressor, driven by a belt connected to your engine, compresses the low-pressure, gaseous refrigerant, increasing its pressure and temperature.
- Condenser: The hot, high-pressure refrigerant gas then flows to the condenser—usually located at the front of the vehicle, often in front of the radiator. Air flows across the condenser (helped by the car's movement and sometimes an electric fan), allowing the refrigerant to release heat and cool down, changing into a high-pressure liquid.
- Receiver-drier (or accumulator): The liquid refrigerant then passes through a receiver-drier (in systems with a thermal expansion valve) or an accumulator (in systems with an orifice tube). This component filters out any moisture and debris from the refrigerant.
- Expansion valve (or orifice tube): Next, the high-pressure liquid refrigerant flows through an expansion valve or a fixed orifice tube. This component creates a restriction, causing the refrigerant to rapidly lose pressure and temperature, turning it into a cold, low-pressure liquid-and-vapor mixture.
- Evaporator: The cold, low-pressure refrigerant then enters the evaporator, located inside the dashboard. As warm air from the cabin is blown across the evaporator's fins, the refrigerant absorbs the heat, causing it to boil and turn back into a low-pressure gas. This process cools the air, which is then blown into the cabin through the vents.
- Back to the compressor: Finally, the low-pressure, gaseous refrigerant returns to the compressor, and the cycle begins again.
How do I know if my car’s AC needs refrigerant?
Several signs can indicate that your AC system might need a recharge:
- Weak or warm airflow: This is the most obvious sign. If the air blowing from your vents isn't as cold as it used to be, or is barely cool at all, low refrigerant is a likely culprit.
- AC compressor not engaging: You might hear a clicking sound when the AC is turned on, which indicates the compressor engaging. If you don't hear this, or if the sound is intermittent, low refrigerant pressure might be preventing the compressor from working. Many systems have a low-pressure switch that disables the compressor to prevent damage when the refrigerant level is too low.
- Hissing or unusual noises: While not always related to low refrigerant, hissing sounds coming from the vents or engine bay could indicate a refrigerant leak, which will eventually require a recharge.
- The clutch on the compressor isn't spinning: With the engine running and the AC turned on, you should be able to see the front plate (clutch) on the AC compressor engaging and spinning. If it's not, low refrigerant could be the issue.